Tuesday, November 5, 2013

Get Upside Down


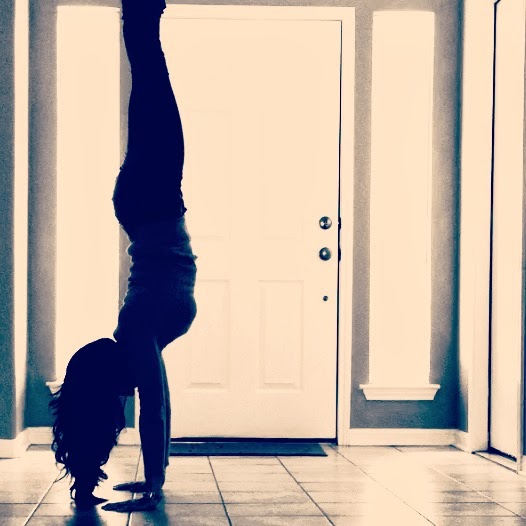
Adho Mukha Vrksasana

Thanks to Instagram I am totally obsessed with being able to do a handstand in the middle of the room. These people are amazing. It's like gravity just doesn't affect them. I have done a handstand pretty much every day since @carsonclaycalhoun hosted #handstandmadness back in March. And guess what? I still can't handstand in the middle of the room. But I keep trying.

I just went to an Inversion workshop with the amazing Kathryn Budig a few weekends ago in Austin. She had a lot of really helpful tips. I keep hearing her voice in my head as I practice. It was scary and fun and I'm very glad I went. If you are interested in doing handstands, I strongly suggest you go to a workshop. You wont get very deep inversion help, or ample time to practice going upside down, in a typical 60-minute flow class. You have to take the extra time if you want to do something extra ordinary.

So maybe I still can't handstand without a wall to help me from toppling over into a backbend. But I have learned a thing or two in my journey. Here is what little I do know about getting upside down:

It's fun. 
It's like an addiction. The more I do it, the more I want to do it. I will seriously be sitting watching TV and have this strong urge to kick up into a handstand. I have been talking to friends and felt like I wanted to just be upside down. It's weird. My brain says "A handstand would be fun right now...do one."

To play with handstands, you have to let go of fear. What are you afraid of? Falling? Well, you most definitely will fall. But most likely, it won't hurt at all. Just be smart. Don't do it over jagged rocks or near a glass coffee table with lit candles. Yes, girl twerking upside on YouTube, I'm talking to you. 

Start facing a wall, in downdog, with heels to the baseboards. Experiment with picking up one leg and pressing it into the wall. Then lift the other leg and press both feet firmly into the wall. There. That's a handstand. 

It's made me stronger. 
Handstands will strengthen your shoulders, arms and wrists. They will tone your core by working the whole torso. While balancing on your hands upside down, you are constantly stabilizing your muscles and working the hell out of your abs and back. 

I have started working handstand practice into my gym routine. I was totally nervous at first. I can't handstand without balancing against a wall, so I felt silly doing it at the gym with all of these people watching me, and seeing that I can't really handstand. But one day I found a relatively quiet corner and practiced. After doing some shoulder press or lateral flies or core work, it feels really great to get into a handstand. The muscles you need to turn on for handstands are already turned on after some weight training. It's a great way to really feel which muscles are being used. Sometimes I practice balancing, and kick right back up into handstand the moment I fall out of it. And other times I lean my whole body against the wall, taking balance out completely, and just hold it as long as I can, seriously fatiguing my muscles. 

It'll wake you up and make you happy.
Getting upside down will send lots of freshly oxygenated blood to your brain and will give your brain a boost. And the intensity of the strength needed to hold a handstand gets your heart pumping and increases energy.

Handstands can also make you feel happier by reducing the stress hormone, cortisol. When the blood rushes through your neck and into your brain, your endocrine system gets stimulated.  The endocrine system is made out of glands and each one of these glands secretes different hormones into your bloodstream. When the adrenal glands are working, the production of the cortisol is reduced. 

It's cool as hell.
They look so damn cool. Look, don't I look cool?


Tuesday, September 10, 2013

Ego

"Leave your ego at the door."
"There is no competition in yoga."
"Acknowledge where you are today and accept it."
"Your ego is not your friend." 
Or, for you bilingual yogis, "Your ego is not your amigo."


If you've practiced yoga, even if for just a short while, I'm sure you have heard some, if not all, of the above phrases from your teacher. The reminder to let go of expectation and dismiss judgement is repeated over and over again. The goal is to move beyond our ego, so that we can know our true self. 

This is so much easier said than done. Looking inward to properly assess where we are (or where we should be) is a very difficult task. We would rather see what everyone else is doing, and then, do it better. We are a people of competition; of comparison. As kids we work to get better grades than our peers. We push ourselves to run faster than our teammates. We crown the prettiest and most handsome at our high school dances. Then it's on to college and snagging the job with the highest income so that we can drive the best car out of all of our friends and have the newest shoes and watches and purses. Everything is about who is better than who.

In the last six months I have seen an obscene amount of yoga photos online. And I love it! I really do. On one hand it has made me a stronger yogi by inspiring me to practice more. It has given me a greater love for these beautiful people who love to do what I love to do. But I have to be real and notice how it has negatively effected me. Just go on to Instagram and scroll through the hashtags #yogaeverydamnday #yogalife or #yogaddict. You will see stunning photos. It is beautiful and it should be celebrated. (Hell, I have even created hashtags like #yogismakebetterlovers and #confidentyogis.) But looking through all of these photos also makes me think things like:

I can't do that! She's such a better yogi than I am.
He makes it look so easy. I'll never be able to do that.
She held that handstand for how long? And in the middle of the room!
That backbend is insane. I was thinking my backbends were strong until I saw this.
She's prettier/thinner/healthier/stronger/wiser/funnier/happier than I.

Wow. What a total bummer.

Yoga was not made to make me feel lesser than anyone else. But that is what we turn it into. It is vital to loose the obsession with what anyone else is doing. When you practice yoga, it is just you and your mat. It's magical to be in a yoga class with other yogis and share that energy, but in the end, your practice is yours and yours alone. Do not concern yourself with how long anyone else held that arm balance or with how deep her splits were. Remember why you started yoga in the first place. It surely wasn't to make yourself feel kind of shitty that you can't do something. It surely wasn't to pull a hamstring while trying to force your foot behind your head because she did it in her photo. It was probably because it made you feel so damn good. You stopped worrying for a short time and stretched and sweated and BREATHED. Get back to that.

OM SHANTI my friends

Check our this article written by Ashley Holly McEachern over at elephantjournal.com
It's a perfect post. Better than mine! ;-)


Wednesday, September 4, 2013

Go Through a Vinyasa


Vinyasa yoga is a term used to described moving from one posture to another in a flowing and smooth manner, where the breath is synchronized with the movements. Your teacher will explain to inhale into one pose and exhale fluidly into another. In vinyasa yoga, the breath links the bodies movement.

If you are in class and your teacher says "take a vinyasa" or "go through a vinyasa" they mean inhale to plank, exhale to chaturanga, inhale to up-dog and exhale to down-dog:


PLANK POSE
Strengthens the arms and spine. Tones the abs.

Key Points:
tailbone tucks under
heels press back
shoulders directly over elbows over wrists
belly button pulls to spine
engage the lats
neck is long
  
1. From hands and knees, get into a push-up position. Draw the torso forward until the shoulders are directly over the wrists and the whole body is in one straight line, from head to heels.

2. Press the hands firmly down and do not let your chest or belly sink. Squeeze the navel back toward your spine, tuck the tailbone under and press back through the heels.

3. Keep the neck in line with the spine and broaden the shoulder blades.

Beginner Tip: Move back and forth between Down Dog and Plank making sure the distance between your hands and feet does not change.


CHATURANGA DANDASANA
Strengthens the arms and spine. Tones the abs.

Key Points:
elbows brush ribs
elbows bent to 90 degrees
shoulders press away from ears
belly button to spine

1. From Plank Pose, firm your shoulder blades down your back and continue to tuck the tailbone, eliminating any arch in your low back.

2. With an exhale, bend your elbows to 90 degrees, brushing your ribs with your elbows and lower your body halfway down to the mat. Take care to not go too low here. Keep your triceps, elbows and shoulders in line with your ribs, your body and legs parallel to the floor. Do not let the elbows go wide, as in a regular push-up, but think of this as a tricep push-up. Keep the tailbone firmly in place and the legs very active and turned slightly inward.

3. Keep the space between the shoulder blades broad. Don’t let your shoulders dip lower than your elbows. Press the bases of the index fingers firmly to the floor. Send your gaze a few inches past your mat, keeping the neck long.

Beginner Tip: Before you lower to 90 degrees, place your knees on the floor.


UPWARD FACING DOG
Strengthens the arms, spine, and wrists. Stretches chest, shoulders, and abdomen.

Key Points:
shoulders are directly over wrists
shoulders pressing back and down
chest open
heels turn toward each other
gaze out and slightly up

1.    From chaturanga dandasana, press into your toes, sending your body forward a few inches. Roll over the toes and onto the tops of your feet. Inhale and press into the inner hands to straighten the elbows, lifting your torso up.  Pull your hands slightly back towards your ribs to help bring your chest forward between your arms. Your thighs and chest do not touch the mat.

2.    Pull your shoulders down your back, increasing the space between your ears and shoulders. Keep the thighs firm and press your heels towards each other. Firm the arms and keep the elbow creases facing forward.

3.    Press the tailbone toward the pubis and bring the belly button to the spine. Do not let the front ribs press out.

Beginner Tip: Bring your thighs to the floor and turn your feet over one at a time, then lift the thighs up. Practice Cobra is Upward Facing Dog is not accessible.


DOWNWARD FACING DOG
Stretches and strengthens the whole body.

Key Points:
heels melt to the mat
tailbone to the ceiling
shoulders square to the front of the room
press into hands evenly

1.    From Upward Facing Dog, exhale and tuck your toes, press into the floor with your palms and send your hips back and up.

2.    Lift your sitting bones toward the ceiling while stretching your heels toward the mat. Straighten your legs but do not lock your knees. Do not let the ribs sink to the mat, but keep a flat back.

3.    Wrap your triceps toward each other, firming the outer arms and keeping the shoulders safe. Press your index fingers into the mat to help with this action. Keep your ears between your biceps; don’t let your head hang.

Beginner Tip: Bend your knees deeply, bringing your torso towards your upper thighs.